Published

danyal.dk
Published

Project 36: Joystick
Overview
For some DIY projects, you perhaps use a component, that is, a joystick module, such as game joysticks. How could they operate?
In this lesson, you will learn how to control a joystick module and micro:bit shield to display the data on a serial monitor.
Component Required
- Micro:bit main board*1
- Keyestudio Micro bit Sensor V2 Shield*1
- USB Cable*1
- keyestudio Joystick Module*1
- Dupont jumper wire*3
Component Introduction
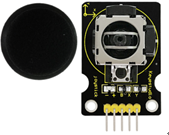
keyestudio Joystick Module:
Lots of interactive projects may need a joystick. This module provides an affordable solution, easy to use.
On the joystick module, it has 3 signal interfaces, which can simulate the three-dimensional space. The signal pins X and Y will simulate the X-and Y-axis of space. Connect them to the Analog Input of the microcontroller. By controlling 2 analog input values to control the coordinate of an object in X- or Y-axis.
Another signal pin Z( labeled B on the module) will simulate the Z-axis of space. Generally connected to a Digital port, and used as a button.

Specifications
- Supply Voltage: 3.3V to 5V
- Interface: Analog x2, Digital x1
- Size: 40*28mm

Follow the complete code session in the following video.